3.Filling The System
Eliminating air from the system is very important. The use of de-aired fluid is required, and this can be purchased from geokon. The liquid used in the system must be one of a known specific gravity to convert the sensor gauge factor, which is presented in kPa/mA to mm/mA. The conversion from kPa to mm of distilled water is: 1 kPa = 102.2 mm of water. If a mixture of distilled water and antifreeze, such as ethylene glycol, or propylene glycol, is used, the specific gravity of the fluid must be measured, and the gauge factor adjusted accordingly by dividing the 102.2 number by the specific gravity. If only distilled water or propylene glycol is used, a very small amount of ethylene glycol antifreeze, (5% by volume), or a couple of crystals of copper sulfate must be added to prevent the growth of algae. The liquid supplied by geokon is a 50/50 mix of propylene glycol and water with an algae suppressant added. The liquid has been de-aired, so keep the container capped up to the time that the liquid is poured into the reservoir. Avoid bubble formation when pouring.
Filling the system is the most difficult job due to the problems associated with entrapped air bubbles and the need to remove them. Two people will be needed for this process: one to tend to the reservoir and vacuum pump, and one to monitor the fluid as it enters the system.
An electric vacuum pump is essential if bubbles are to be avoided. (Vacuum pumps may be purchased from geokon.) Without a vacuum pump bubbles will form in the tubing and will need to be 'chased' out. If an electric vacuum pump is infeasible, then use a hand-operated Mytivac vacuum pump. (Available as an accessory or can be obtained from an automotive store.)
The systems can be filled from the reservoir or from the far end of the tubing, as described in the following sections.
5:
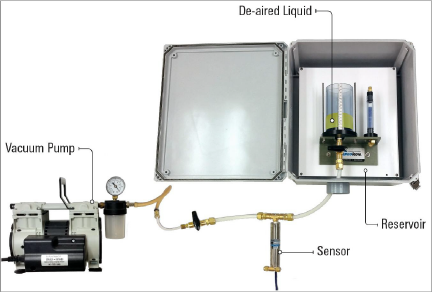
Figure 5: Filling from the Reservoir
First, attach a length of ½" tubing (three feet has been provided) to the last sensor in the string furthest from the reservoir. To that piece of tubing, swage on the provided bidirectional valve. (See Appendix C for Swagelok instructions.) Next, a length of 6.4 mm (¼") tubing, long enough to reach the vacuum pump, can be cut from the 3-meter (10') piece provided and attached to the opposing side of the valve. A piece of rubber tube and a union have been included which may aid in the connection of the pump.
Close the valve on the bottom of the reservoir then fill the reservoir with de-aired liquid. Open the valve nearest to the vacuum pump and turn the pump on to start evacuating the system.
A general recommendation for the vacuum pressure level is below 10 Mbar when filling the settlement systems, but this may not be possible depending on how large the system is, and the strength of the pump that is being used. The lower pressure the better, to build confidence that there aren't any leaks in the connectors.
When the vacuum has been established, fill the reservoir with de-aired liquid and then open the valve at the base of the reservoir and allow the de-aired liquid to flow and fill the lines up to each sensor. Be sure to add de-aired liquid to the reservoir as it is draining into the system to prevent air from contaminating the tubing. Avoid forming bubbles when pouring. Monitor the liquid as it nears the vacuum pump and close the valve closest to it before the liquid is drawn in. Turn off the pump.
Caution: The pump can be damaged if the liquid is allowed to enter the pump.
If air becomes trapped inside any sensor, you must be bleed it off by removing the seal screw on the top of the tee fitting from each sensor in turn (Figure 6) and by extracting air or liquid from the sensor through the seal screw hole using the syringe supplied (Figure 7). When all the air has been removed from all sensors, replace the seal screws. If a bubble is observed in the liquid line, 'chase' the bubble back to the reservoir, or to one of the sensor fittings, where it can be allowed to escape by slightly opening the connector at this point and/or opening the seal screw on the tee. Adjust the level of fluid in the reservoir with the supplied syringe to approximately midway.
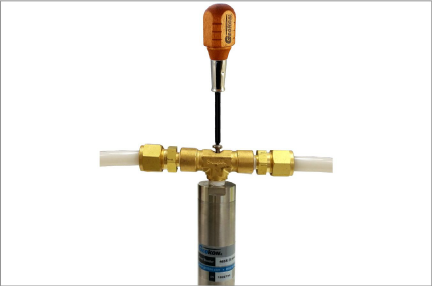
Figure 6: Seal Screw Removal
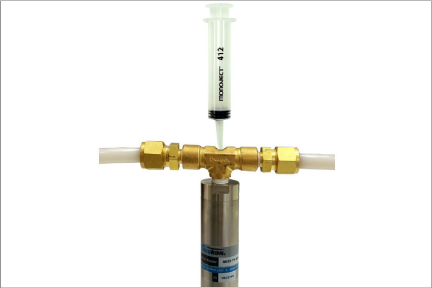
Figure 7: Using Syringe for Air/Liquid Extraction
3.2Filling from the Far End of the Tubing
8:
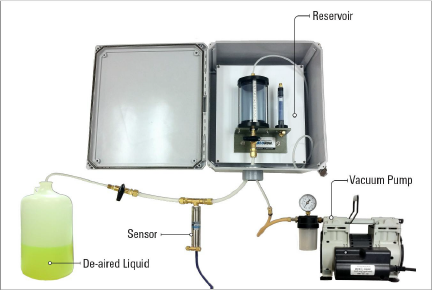
Figure 8: Filling from the Far End
First, attach a length of ½" tubing (three feet has been provided) to the last sensor in the string. To that piece of tubing, swage on the bidirectional valve provided. (See Appendix C for Swagelok instructions.) Next, cut a length of 6.4 mm (¼") tubing, long enough to reach the vessel containing the settlement fluid, from the 3-meter (10') piece provided and attached to the opposing side of the valve. Insert the free end of the tube into the fluid and close the valve.
At the reservoir end, swage to the top of the reservoir a length of the 6.4 mm (¼") tubing, long enough to reach the vacuum pump. Attach the free end to the vacuum pump and apply a vacuum to the system with the reservoir valve open. A piece of rubber tube and a union have been included which may aid in the connection of the pump. A general recommendation for the vacuum pressure level is below 10 Mbar when filling the settlement systems, but this may not be possible depending on how large the system is, and the strength of the pump being used. The lower pressure the better, to build confidence that there aren't any leaks in the connectors.
When a vacuum has been established, open the valve on the far end of the system to allow de-aired fluid to flow through. To prevent bubbles in the system, combine all the fluid into one large container or leave the fill line in one vessel and continue to add fluid into it, making sure the liquid level never falls below the end of the fill tube where air could then be introduced into the system. Once fluid has filled the entire system and has entered the reservoir, disconnect the vacuum pump and close the valve on the far end. Remove the 6.4 mm (¼") vacuum pump extension tube from the reservoir.
If air becomes trapped inside any sensor, you must be bleed it off by removing the seal screw on the top of the tee fitting from each sensor in turn (Figure 6 above) and by extracting air or liquid from the sensor through the seal screw hole using the syringe supplied (Figure 7 above). When all the air has been removed from all sensors, replace the seal screws. If a bubble is observed in the liquid line, 'chase' the bubble back to the reservoir, or to one of the sensor fittings, where it can be allowed to escape by slightly opening the connector at this point and/or opening the seal screw on the tee. Adjust the level of fluid in the reservoir with the supplied syringe to approximately midway.