5.Tools and Procedures
5.1Special Tools And Apparatus Required For Test Procedures
■GK-404 or GK-405 Readout Box
■Assorted wrenches
■Nitrogen supply cylinder with regulator valve
■Pressure tanks filled with de-aired liquid (50% antifreeze solution made with distilled water and containing dye)
■Vacuum pump and rubber connecting hoses with pinch clamps
■Motor generator (Gasoline powered)
■Auxiliary reservoir
■Miscellaneous connecting tubes and fitting
Periodic flushing of the liquid filled tubes may be required to remove air bubbles. A 300 meter (1,000 foot) length of tubing requires 2.5 liters (0.67 gallons) of liquid. Tubes should always be filled with de-aired liquid. Dye, such as red food coloring, can be added to the new flushing fluid to indicate when the flushing is complete.
The best way to de-air a liquid is to use a Nold DeAerator (ask Geokon for more details). De-aired liquid is also available from Geokon in two gallon or five-gallon pressure tanks specially designed to prevent air from reaching the fluid. The liquid should also resist the growth of algae and should not be liable to freeze in cold climates. The growth of algae can be prevented by dissolving a crystal of copper sulfate in the liquid or by using commercial grade ethylene glycol solutions, which also prevent freezing. The use of distilled water, rather than tap water, is recommended. The figure below shows the apparatus recommended for flushing the tubes.
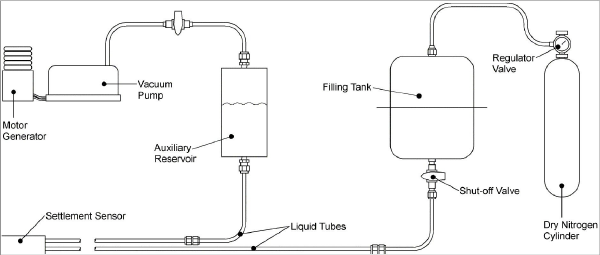
Figure 11: Flushing Apparatus
Note: A hand pump can be used in place of the nitrogen cylinder.
1.Close the shut off valve at the base of the reservoir.
2.Disconnect one of the tubes and then reconnect it to the base of a filling tank that is filled with de-aired liquid.
3.The second tube is disconnected and attached to the base of an auxiliary reservoir. (For tubes longer than 200 meters (650 feet), attach a vacuum pump to the top of the auxiliary reservoir to hasten the flushing process.)
4.Connect a nitrogen cylinder with regulator to the top of the filling tank.
5.Start the vacuum pump running then open the valve at the bottom of the pressure tank.
6.Adjust the nitrogen pressure until the settlement sensor reads at its maximum range value on the Readout Box. (See Section 3 for Readout instructions.) Be careful not to over range the sensor by more than 20%.
CAUTION! Do not allow the nitrogen pressure to exceed the pressure rating marked on the outside of the filling tank (usually 100 psi (700 kPa). Failure to observe this precaution could result in injury.
7.Continue flushing until all the old liquid has been removed. (As flushing proceeds, the auxiliary reservoir may need to be emptied periodically.)
8.Store the flushed liquid in a container for later disposal. Do not allow any liquid to enter the vacuum pump as this could ruin it.
9.When flushing is complete, reconnect the fluid lines to the base of the reservoir. Be careful not to introduce air bubbles during this process.
The vent line must always remain open because it connects the inside of the sensor to the space above the reservoir. Any blockage of the vent line due to pinching, dirt, or moisture will cause false readings that fluctuate and/or are sensitive to temperatures.
Blockages due to pinched tubes can be confirmed by applying a vacuum to the vent line and observing the reading on the sensor. If the sensor does not respond the tube is blocked by dirt or pinched, and this might be correctable if the blockage is accessible. Blockages due to moisture and condensation can be purged using a vacuum pump to evacuate the vent line. As the vacuum is applied watch for signs of water in the vent line. When the vacuum has stabilized, stop the pump, disconnect the vent line, and quickly reattach either a desiccant chamber containing fresh desiccant, or a cylinder of dry nitrogen. This ensures that the gas drawn back into the vent line is dry. Make sure the vent line connection is open between the desiccant chamber (or vent line manifold) and the top of the reservoir.