Appendix D.Casing Repair
If an inclinometer casing becomes damaged, it can be repaired. The following items are required:
nModel 6600-1C Replacing Coupler
nModel 6600-2 Quick-Lock Coupling Wire
nModel 6600-2RT Reconnect Alignment Tool
nModel 6600-1-10 Section of Inclinometer Casing
nModel SUP-806 Duct Tape
nABS cement (supplied locally)
Figure 18: ABS Cement (example)
Typically, the damaged section of a casing is in the upper few feet of the installation, where the casing is most vulnerable.
The procedure to replace a damaged section of casing is as follows:
1.Determine the length of replacement casing needed for the process.
Note: Be sure to include the length of the replacing coupler when making your determination.
2.Cut the existing casing below the damaged section according to the measurements completed in Step 1. Make the cut as perpendicular as possible to the axis of the casing.
3.Cut the replacement casing to the appropriate length.
4.Debur the edges of both cut casing sections and clear any debris from the portion that will be coupled.
5.Apply ABS cement to the outside of the top of the existing casing.
19:
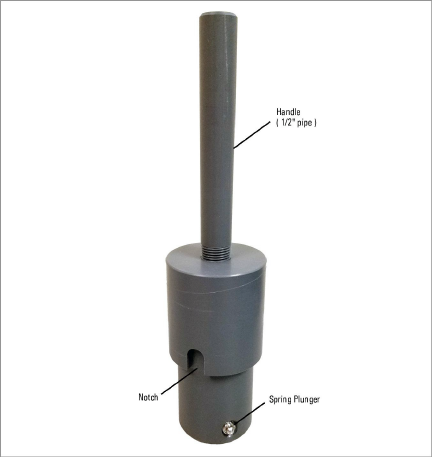
Figure 19: Model 6600-2RT Reconnect Alignment Tool
6.Slip the replacing coupler onto the bottom of the alignment tool, to the point where the tab inside the coupler slides into the notch in the tool.
7.Grasp the tool by the handle and slide the coupler onto the top of the existing casing.
8.Twist the tool until the silver spring plungers on the tool slip into the grooves on the inside of the existing casing.
9.Press the tool downward until you meet solid resistance.
10.Press down on the coupler to keep it in place while you pull upward to separate the tool from the coupler.
11.Allow the cement to cure.